Code for Keeps:- Serialization

Another one of my favorites!..Everytime i need to serialize an object i end up surfing the web to get the correct code(who wants to reinvent the wheel!!)

Also most of the time i don’t want to “save” the object on the filesystem but just in memory so my code will focus on saving and reading from memory!

First the simpler one..XMLSerialization

1. XML Serialization

Serialize the object

   private void SerializeObject(<ObjectType>obj)
   {
        XmlSerializer s = new XmlSerializer(typeof(<ObjectType>));
        StringWriter sw = new StringWriter();
        s.Serialize(sw, sessionToken);
        string serializedXml = sw.ToString();
    }

Reading from the string

 private <ObjectType>ReadFromSerializedString(string s)
  {
  XmlSerializer s = new XmlSerializer(typeof( <ObjectType>));
  return (<ObjectType>)s.Deserialize(new  StringReader(serializedString));
  }


However you may not be able to use XMLSerialization on all object types…one irritating requirement is that the object to be serialized should have an parameterless constructor!!. This requirement led me to try Binary serialization….

2. Binary Serialization

Serialize the object

private void SerializeObject(<ObjectType>obj)
{
    var formatter = new BinaryFormatter();
    byte[] bytes;
    using (var stream = new MemoryStream())
            {
             formatter.Serialize(stream, obj );
              stream.Seek(0, 0);
              bytes = stream.ToArray();
            }
string serializedString = Convert.ToBase64String(bytes);
}

Reading from the string

 
private <ObjectType> ReadSerializedString(string serializedString)
 {
     byte[]b =Convert.FromBase64String(serializedString);
    var formatter = new BinaryFormatter();
     <ObjectType> value;
     using (var stream = new MemoryStream(b, 0, b.Length))
     {
            value = <ObjectType>formatter.Deserialize(stream);
     }
    return value;
}

Now i won’t have to google my serialization out!..hope this helps you save some time too!

Until Next time!

Cennest!!

Bulb Flash:- Few tips to Reduce Cost and Optimize performance in Azure!

Applications deployed on azure are meant to 1. Perform better at 2. Lesser cost.

As a software developer its inherently your job to ensure this holds true..

Here are a few pointers to keep in mind when deploying applications on Azure to make sure your clients are happy:-)

Application Optimizations

  • Cloud is stateless , so if migrating an existing ASP.NET site and you are expecting to have multiple web roles up there then you  cannot use the default in memory Session state..You basically have 2 options now
    • Use ViewState instead . Using ASP.NET view state is an excellent solution so long as the amount of data involved is small. But if the data is huge you are increasing your data traffic , not only affecting the performance but also accruing cost… remember..inword traffic is $.10/GB and outgoing $0.15/GB.
    • Second option is to persist the state to server side storage that is accessible from multiple web role instances. In Windows Azure, the server side storage could be either SQL Azure, or table and blob storage. SQL Azure storage is relatively expensive as compared to table and blob storage. An optimum solution uses  the session state  sample provider that you can download from http://code.msdn.microsoft.com/windowsazuresamples. The only change required for the application to use a different session state provider is in the Web.config file.
    • Remove expired sessions from storage to reduce your costs. You could add a task to one of your worker roles to do this .
  • Don’t go overboard creating multiple worker roles which do small tasks. Remember you pay for each role deployed so try to utilize each node’s compute power to its maximum. You may even decide to go for a bigger node instead of creating a new worker role and have the same role do multiple tasks.

Storage Optimization

  • Choosing the right Partition and Row key for your tables is crucial.Any process which needs to tablescan across all your partitions will be show. basically if you are not being able to use your partition key in the “Where” part of your LINQ queries then you went wrong somewhere..

Configuration Changes

  • See if you can make the following system.configuration changes..
    • expect100Continue:- The first change switches off the ‘Expect 100-continue’ feature. If this feature is enabled, when the application sends a PUT or POST request, it can delay sending the payload by sending an ‘Expect 100-continue’ header. When the server receives this message, it uses the available information in the header to check whether it could make the call, and if it can, it sends back a status code 100 to the client. The client then sends the remainder of the payload. This means that the client can check for many common errors without sending the payload. If you have tested the client well enough to ensure that it is not sending any bad requests, you can turn off the ‘Expect 100-continue’ feature and reduce the number of round-trips to the server. This is especially useful when the client sends many messages with small payloads, for example, when the client is using the table or queue service.
    • maxconnection:-The second configuration change increases the maximum number of connections that the web server will maintain from its default value of 2. If this value is set too low, the problem manifests itself through "Underlying connection was closed" messages.

WCF Data Optimizations(When using Azure Storage)

  • If you are not making any changes to the entities that WCF Data Services retrieve set the MergeOption to “NoTracking”
  • Implement paging. Use the ContinuationToken and the ResultSegment class to implement paging and reduce in/out traffic.

These are just a few of the aspects we at Cennest keep in mind which deciding the best deployment model for a project..

Thanks

Cennest!

Creating An “Extensible” Consolidated Social Networking Platform in WPF using MEF

One of my recent projects was on Social Networking where we worked with various social networking sites like WL, Facebook, Delicious, Twitter ,Picassa, Flickr etc to bring them to a common platform for a user.

It was a pretty interesting application and i’ll try to demonstrate multiple WPF patterns we implemented in it.

One was the use of Plugin model using the “Managed Extensibility Framework”. The user could upload his photographs to multiple providers at the same time. The challenge given here was “we should be able to add another provider to the system at any time after the application is already deployed”. So at the time of development we develop for Flickr and Picassa but now YouTube is also allowing Photo upload so now we want to support You Tube but without opening up the code!!

We used the Managed Extensibility Framework for this.I’ll explain the core concepts of MEF(mostly picked up from the MEF guidelines document) and show you how we implemented this seemingly tough requirement easily.

What is MEF?

The Managed Extensibility Framework (or MEF for short) simplifies the creation of extensible applications. MEF offers discovery and composition capabilities that you can leverage to load application extensions.

  • MEF provides a standard way for the host application to expose itself and consume external extensions. Extensions, by their nature, can be reused amongst different applications. However, an extension could still be implemented in a way that is application-specific. Extensions themselves can depend on one another and MEF will make sure they are wired together in the correct order (another thing you won’t have to worry about).
  • MEF offers a set of discovery approaches for your application to locate and load available extensions.
  • MEF allows tagging extensions with additonal metadata which facilitates rich querying and filtering

MEF is all about composable parts, which come in two flavours; imports and exports.  An export is something you want to share and an import is the point at which you want to inject an export.

So in our case the “Photo Providers” are our “Exports” and the core Platform Consolidation application  had an “Import” point for them.

MEF needs to a way of knowing about what exports it has at its disposal and what imports require “composing” (or matching up to available exports).  In MEF this is the CompositionContainer which contains a Catalog of exports

So basically your “Catalog” has all the “Exports” Now how you make the Catalog  is very important to how your exports will be identified.

There are multiple Catalog Options available for WPF

Assembly Catalog

To discover all the exports in a given assembly

Directory Catalog

To discover all the exports in all the assemblies in a directory .The DirectoryCatalog will do a one-time scan of the directory and will not automatically refresh when there are changes in the directory.

Aggregate Catalog

When AssemblyCatalog and DirectoryCatalog are not enough individually and a combination of catalogs is needed then an application can use an Aggregate Catalog.An AggregateCatalog combines multiple catalogs into a single catalog.

Type Catalog

To discover all the exports in a specific set of types one would use  the Type Catalog.

Since we wanted a model where we just drop a new dll into the project and the new provider is up and running we went ahead with Directory Catalog.

Here are the 3 steps we did

1. The Imports and Exports need to agree to an Interface. So we made an IPhotoProviderInterface and the Exports i.e the PhotoProviders adhered to it.

2. Marked the Providers with the “Export” attribute for the IPhotoProviderInterface

[Export(typeof(IPhotoProviderInterface))]
public class PicassaProvider :IPhotoProviderInterface
    {
        ...
    }

On Application(Our CompositionContainer)  Startup we wrote code to read a specific directory to look for exports .

2. Create a list of IPhotoProviders which will hold instances of the providers going to be loaded and mark it with the Import Attribute

[Import]
public IEnumerable<IPhotoProviderInterface> PhotoProviders { get; set; }

3. Create a DirectoryCatalog to read the new providers…

private void LoadProviders()
{
  try
  {
      var catalog = new DirectoryPartCatalog(@".\Providers\");
      var container = new CompositionContainer(catalog);

      container.AddPart(this);
      container.Compose();
      foreach (IPhotoProviderInterface sender in PhotoProviders)
      {
          ......
      }
  }
}

From here onwards the Providers were present in the PhotoProviders list….

It was a pretty neat implementation and we got a 100% for extensibility here…MEF looks daunting with all these new keywords but its pretty simple to implement!!

If you are looking to make a scalable and extensible application…we have the expertise and the experience to help you get there….drop us a note at cennesttech@hotmail.com..

Until Next time!

Cennest

Azure:- What Azure Offers and what exactly does “Compute” mean?

An architect always has the tough job of convincing the client that the solution deployed is “optimum” under the given constraints!!.

Especially when it comes to Azure where there is a constant Cost vs Compute fight!!.

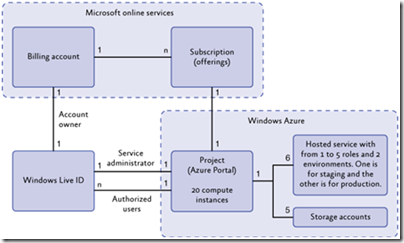
Got this excellent diagram from the Windows Architecture Guidance which illustrates what you get when you create an Azure account..

image

Basically when you select Azure as an offering in your subscriptions you get

  • One Azure Project(Portal).
  • Within this portal you can host upto 6 Services(Websites)
  • Upto 5 Azure Storage Accounts(each with 100TB of data).
  • Interesting Limitation:- Each service can have only upto 5 roles(Web+ worker in any combination)
  • Very Interesting Limitation:- The entire project can consume only 20 compute instances!!

The last point is extremely important, but to understand its significance we need to understand some basics in Azure.

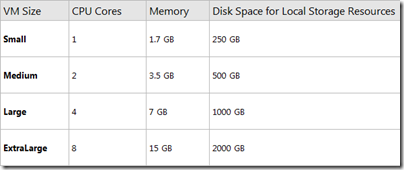
You create your service as a combination of web + worker roles, each role you configure runs on a Virtual Machine(VM) 

For each role you can define the size of VM you prefer, based on the memory and disk space requirements expected or that role.

Here are the configurations for the VMs

image

Compute Power is equal to the number of CPU cores being consumed by your VM!!

Suppose you had 2 role configured for 3 instances, each on Large VMs then you consumed 2*3*4=24  instances of the CPU core and are actually out of space!!.

The  calculation is Role*instances*No of CPU Cores in VM.

A very important point to remember when you define the tasks being accomplished by your roles and the kind of VM they are being hosted on!!

Cennest!!

Bulb Flash:- Remember the restrictions in Azure!!

Was collating all sorts of size restrictions for tables, blobs etc but found this really useful post by Cerebrata which has the exact info i wanted to collate!!

Another useful blog by them is on the differences between Dev storage and cloud storage…will help prevent frustrating moments while going uphill the learning curve!!

Thanks Cerebrata!!

Cennest!